Daniel writes:
I was reading (Nick’s) post on assembling an AR lower assembly. It was awesome and the associated video answered all my questions and was done very well. All fan boy aside, I was wondering if he could do one for putting together an upper.
I’ve been avoiding doing this one since putting together an upper receiver can be a real pain in the butt. It requires some tools which I don’t have readily available (and probably wouldn’t work in my apartment), but thankfully Tyler Kee offered to give me a hand and show me how it’s done over a few beers in his garage.
Step 1: Forward Assist
Some upper receivers don’t come with a forward assist, but for those that do you’ll need to pop it in. The whole assembly is held in place by a roll pin, and relatively speaking this is the easiest part of the whole process.

Configure the forward assist as shown. The flat side of the forward assist should be positioned towards the outside, while the somewhat curved section should be on the inside. You’ll notice that there’s a recessed section cut out of the forward assist (on the side facing the bolt carrier) — this is where the roll pin will sit and keep the assembly from either popping out or going in too far.

Place the assembly inside the housing. When the forward assist assembly is properly lined up you should be able to see daylight through the roll pin hole. At that point simply take a hammer and bash in the pin. I recommend giving the forward assist a bit of a jiggle every now and then while driving in the pin to make sure that the recessed area is perfectly aligned with the roll pin and nothing is binding.
Step 2: Dust Cover

The dust cover is a bit of a pain in the butt, and the reason is the spring. It needs to be positioned so that it applies force to the dust cover and keeps it out of the way while firing, and getting the spring to cooperate can be a nuisance. The best way to do this is to place the dust cover on the gun, insert the retaining rod halfway, and then place the spring in position using the retaining rod to keep it in place. The long end of the spring should be on the dust cover, while the short end should be on the gun.

Exhibit A: Tyler struggling to get the spring in place. Once complete you should have a functuoning dust cover. Be aware that the retaining rod for the dust cover isn’t held in place with anything — it stays put because the barrel nut that we’re about to put on keeps it there.
Step 3: Inserting the Barrel
The barrel itself on an AR-15 isn’t actually screwed into anything. The barrel is attached to the barrel extension, and the barrel extension is held in place by the barrel nut. The trick is getting the correct torque on the barrel nut to keep everything in place — too much or too little torque can ruin your gun’s accuracy.

For this part, the perfect tool for the job is a Geissele Reaction Rod.Available as part of their armorer’s package, the reaction rod allows the builder to rotate the upper receiver however needed while still keeping the barrel and everything else perfectly still and aligned. Clamp that sucker down in the vice and we’re ready to roll.

The goal is to have the slotted end of the reaction rod sticking out when the upper receiver is placed on the rod. We will be aligning the barrel with the slotted end and then sliding the upper receiver to mate with the barrel extension. There’s a small notch at the top of the upper receiver that will index with a pin on the barrel extension — this is what keeps the barrel from rotating in the gun and allows us to align everything while building.
It is recommended that some lubricant is applied to the reaction rod slotted end before inserting into the barrel. The clearances are very tight here, so it is possible that your barrel extension might get scratched up or stuck. Tyler recommends KG Industries’ Micro Moly Dry lube.

Once the two parts are mated we can move on to adding the barrel nut and locking this whole thing in place. Again, a small amount of lubricant on the upper receiver threads has been applied to make the process easier and to keep the two different materials moving against each other.
Step 4: Installing the Barrel Nut
The barrel nut not only keeps the barrel mated to the upper receiver, but this is where we will be mounting our handguards. It seems like every handguard manufacturer has their own specs and instructions so be sure to follow yours, but I’ll give a general overview to the process here.

The idea is to “time” your barrel nut properly onto the gun. First using your hands to screw on the barrel nut and then a calibrated torque wrench, the device should be perfectly aligned with your gas tube hole in the upper receiver (and square with your top rail) when the proper amount of torque is applied. If this isn’t the case then there are ways to adjust the position of the barrel nut. Some kits use shims, others use screws, but whatever you use there will be instructions provided.
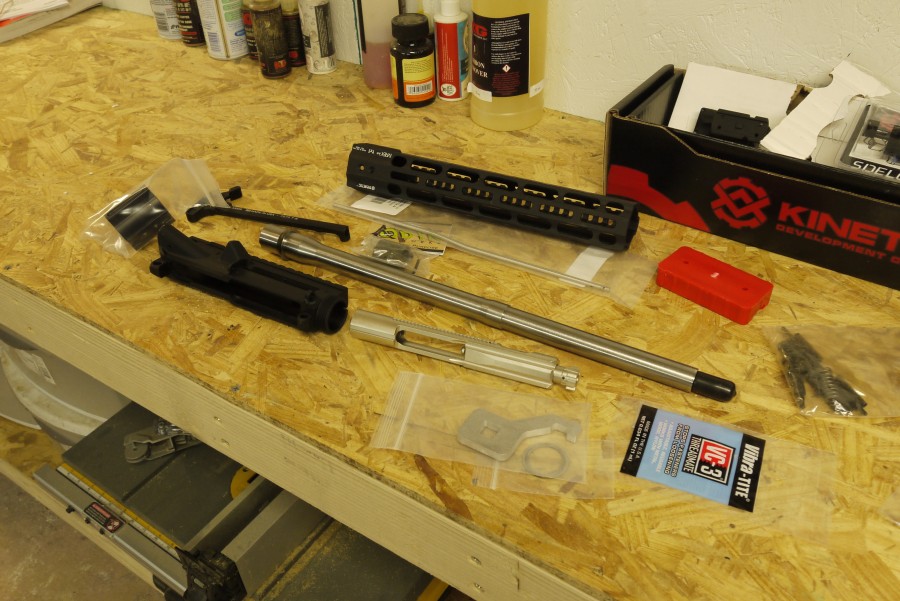
Here, Tyler is trying to install the Kinetic Development Group handguard for the AR-15. I like how they did the SCAR rail and I was looking forward to having one on an AR-15 as well. The barrel nut uses a shim kit, and the nut itself is designed with two sets of threads so that the device can be installed with two starting points 180 degrees off from each other. That all makes it easier to get everything timed, but the problem we ran into was with the provided tool.

That’s not supposed to do that. Having broken the tool we decided to swap to a Seekins rail instead that was easier to install.

Once everything was in place it was time for the final piece of the puzzle: the gas tube.
Step 5: Gas Tube
The gas tube redirects hot gasses from the barrel into the gas key on the bolt carrier group and provides the energy to cycle the action. Preparing the gas tube and installing it is relatively simple.

The first thing to do is pin the gas tube in place in the gas block. The gas block will slide over the barrel and provide the connection between the tube and the port in the barrel. Align the gas tube such that the cut in the side of the tube at one end is aligned with the hole in the bottom of the gas block, and then pin the whole thing into place. Again, Tyler is using another tool from the Geissele armorer’s set to start this pin and I am totally jealous of how easy it makes things.

Once the gas tube and block are pinned together we can move to install them on the barrel. The gas block should align with the hole in the barrel, and the gas tube should feed through the barrel nut and into the upper receiver. When a bolt carrier is placed inside the gas tube should slot into the gas key on the bolt without any complaint.

Aligning the gas block perfectly can be an issue. Tyler says that this is the easiest way — use one finger to block the chamber, blow into the muzzle, and identify when everything is aligned based on when you feel the least resistance to air flowing through the gas tube. It works, but it does look a little wrong…
Step 6: Add the Handguards

Again, this step will be different for every manufacturer. Whether your handguards screw in or bolt in all you should need to do at this point is to affix them to the barrel nut and you’re done.
Step 7: Admire your Work

Or, in this case, your slightly inebriated buddy’s work who did everything for you while you sat around drinking his beer. Which, BTW — 10/10, would recommend.
[Email your firearms-related questions to “Ask Foghorn” via [email protected]. Click here to browse previous posts]


You sir are right!
That looks VERY wrong!
Or you can just buy a completed upper because I’m paying to not deal with that headache
Interesting, guess I have never seen ~$100 worth of tools and maybe 30mins of time as a “headache” but people have different opinions on what constitutes a headache.
I think the biggest case for building your own is that you get exactly what you wanted. If yiu just want a 5.56 M4 clone the yeah makes sense to buy, or if one of the off the shelf mfgs offers the hanguard, caliber, barrel length, profile etc that you are looking for then yeah buy buy buy. You start losing money though the second you change anything on that store bought upper.
I built mine because nobody offered exactly what I wanted. There were some that came really close and in the end I probably would have been happy with the compromises made, but for 30 minutes of time I got EXACTLY the rifle I wanted. I also bought a lower that has no rollmarks on it so by building my own I’m also not carrying around a $1500 billboard for for the company who’s parts I used. I like to have my cake and eat it too!
I didn’t even spend a hundred dollars on tools to build mine. Perhaps if I were to do it more often I would, but some basic hand tools and a barrel nut wrench are all I used. Not even a vise.
I built an upper last year with pliers, hammer and channel locks. It shoots sub MOA and the barrel nut was at 30ft lbs when I checked it with a real torque wrench. I later bought the normally $200 Wheeler AR armorer’s kit for $80 on sale from Cabelas with a few Cabelas points. It’s made builds infinitely easier. Now I’m building AKs. That takes some tools!
I use a plastic pick to align the gas block (pre-tube installation). Basically put on the block, insert the pick into the tube slot, and align the block. Since the hole on the block is larger than the hole in the BBL, the pick should be able to make a circle without ‘falling in’ the gas port on the BBL. Mark it with a grease pen or soap stone, remove and attach gas tube, reinstall to alignment markings. Done. This works with all the various blocks I’ve used making entirely too many uppers.
Yes, that is entirely too OCD, heh 😀 But its my party and I can OCD if I want to 😉
Aeroshell 33MS is excellent for the BBL nut / extension install and will help prevent galvanic corrosion.
Nice. Was hoping for this. Not as complicated as the lower methinks, but does have annoying bits. :p
If your BBL lines up properly within the torque spec (for the gas tube/piston to clear the BBL nut) uppers are super easy and quick to do. If it does not, then it can be a time-consuming PITA.
I have the necessary tools, I have the knowledge, but I don’t currently have a garage for my work bench and vice. So unfortunately I would have to order an upper. Lowers are easy, I put my first one together with only a punch, plastic hammer, a razor blade(hold the spring and detent in for front takedown pin, and a driver for the grip screw.
I’m in the same boat, but I’ve built two uppers in an apartment on a dining table (against wife’s wishes) and it worked out fine. Don’t have a vice, which would’ve made everything a lot easier, but if you’re determined, you’ll figure something out.
I’ve built a couple lowers from parts kits but always bought the uppers. Still would want to buy complete uppers in the future but if I got a cheap sale upper parts kit I’d build it for the hell of it and learn how to do it. If I F it up I wouldn’t be out much money.
I know using mil-spec parts everything should line up, but go and no go gauges are important to check before firing. If for some reason your in spec parts resulted in an out of spec chamber, your mint AR just became a grenade.
The dust cover rod is held in place by something! It is called a hinge pin clip, or a c clip.
http://www.primaryarms.com/ur-02/p/ur-02/
For some reason most build guides do not include this step.
Yeah, because its a PITA. Every build kit should include two.
3, the one you saw go flying across the room but couldn’t find.
The one you lost under the workbench.
The one that went on just fine.
Heh. Hate those things.
Agree with that….believe it or not, hardest part of building an AR is those dust cover C clips.
Takes me 3 or 4 to finish. They love to fly.
Use a set of needle-nose pliers with well-fitted jaw tips, clamp the C-clip right in the middle of the “C” with the legs outward, then press it firmly down into the groove; done on the first try.
For the ejection port cover spring, insert the dust cover hinge pin until it’s halfway into the spring, then grab the end of the spring that DOESN’T have the pin in it, pull it outward and twist it in the correct direction to position the end properly, then hold it in place with your thumb and slide the pin in the rest of the way. In the above photos, the spring is installed backwards (when the door is rotated closed against that spring’s pressure, it is trying to “unwind” the spring; it should be trying to wind it tighter). The longer leg of the spring should be closest to the muzzle.
I’m no gun smith but I’ve built several uppers and I am an mechanical engineer. The engineer in me freaks when I see the torque driver not perpendicular (at a 90) with the barrel nut tool. In the picture demonstrating the barrel nut/torque tightening, you are changing the “length of the lever” that the torque wrench is calibrated for. This means you are applying more torque than you are measuring with the torque wrench. This may be why the adapter sheared off and you had some difficulties. Don’t do this.
Make sure to use use a torque wrench when installing the barrel nut and use a progressive tightening/loosening process to get the gas tube aligned. Don’t crank the nut up to the (usual) 80 ft lbs max on the first go round. Aluminum no likey that kind of stress.
Finally, when you have gas tube aligned properly, mark it with a paint pen or silver sharpy. That way, you can check to make sure that it hasn’t moved later if your rifle has issues. I have seen a few guys rifle stop cycling and it turned that the gas block only moved slightly. Remember you are lining up two +/- .075″ holes. A slight movement will have a big impact..
Bdk NH, what do you think about using something like Brownell’s barrel extension tool (like the ‘reaction rod’) for torquing down the nut?
You essentially put the BBL nut wrench in a vice, facing up, slide the BBL/nut down to where it seats in the wrench, then torque using the receiver extension tool. It is directly perpendicular the BBL/Nut, not offset at all as it would be putting the torque wrench on the nut wrench. See the video on Brownell’s page if my description is terrible:
http://www.brownells.com/gunsmith-tools-supplies/rifle-tools/barrel-tools/ar-15-m16-barrel-extension-torque-tools-prod27452.aspx
This is how I’ve been doing it for the last 6 upper builds or so.
Looks like a damn good idea to me to basically allow the torque wrench to operate as a “socket wrench” like it was intended. I may have to order one of those. Still need a torque wrench to do it right. Again, I am not a gun smith so take it FWIW.
I just sent an EOTECH XPS 2-2 back for full refund so I have $499 gun dollars burning a hole in my pocket. May be time to build the Grendel upper I have been thinking about and try that tool out.
Yea, I was going to point out how the progressive toque load on the barrel nut is used to work-harden the aluminum, but that’s probably a technical detail that will require mounds of explanation…
Metal moves, it gets hard. It gets hard, it gets brittle. It gets brittle, it breaks.
I like simple 🙂
Like others here, I have assembled numerous lowers but buy assembled uppers. When purchased from better sources all are checked and test fired. Open box, pop two pins into place, start shooting. I prefer BCM and White Oak. Both won’t leave the factory till they are right. They aslo shoot fantastic.
Shhhh, don’t be telling everyone how easy it is to assemble an upper – when the next panic comes around I still want to be able to buy barrels, gas blocks, and stripped uppers!
Seriously, though, knowing how to assemble an upper was an absolute necessity for me to build my M16A1, M16A2, and M16A4 clones because I had to scrounge up all the parts from various sources to make accurately represented clones. Unless one wants to pay a mint, it’s not like you can simply purchase a quality M16A1 upper. The hardest part is always timing the barrel nut and gas tube while keeping within the torque specs.
Agreed. BBL nut timing can take an upper build from a 15min job to a whole lot longer when it does not want to time within the torque spec.
I built my upper with nothing but a $15 dollar upper clamp and an itty bitty $20 vice I found at Lowes. My forearm came with a tool to attach to a socket. Everything else is typical tool box stuff for the most part. Didn’t even have punches, just used a tiny wrench out of my metric hex wrench stash for a pin punch. I spent several hundred dollars less then what a pre assembled version of my upper I built cost. Shop around, be patient, do your homework, and be careful building. If I built one in my little bitty living room with no bench, and basically no special tools anyone can.
Plus I bet I know way more about my gun then you do yours if you didn’t build it. I assembled and know every little pin, spring, etc on my rifle.
My advice for a novice is buy one built by a reputable manufacturer, get to know the platform and decide if you like it. Then build a budget AR for practice, then build your dream rifle. If you can afford to do so. I have helped a few people assemble budget guns for their first because they could not afford to buy one. $50 lower and $399 for a psa parts kit makes the AR affordable.
where ca I get a barrel extension line up pin? Any one know WILD bILL
Comments are closed.