In part 0ne, I discussed the various technologies and players in the force-on-force marking round business. For part two, I’m going to delve into the training side of the equation. Although there are at least three companies that produce force-on-force marking ammunition, only SNC/GD’s system can be referred to as Simunitions as they own the trademark to that term. In some ways, it’s similar to the way people still refer to photocopies as “Xerox” copies even though most photocopies aren’t made on Xerox branded machines. To avoid confusion (and given the fact that the two non-Simunitions companies appear to produce superior products) I’m going to use the term, “marking round” when referring to it. Folks who get bent out of shape when people refer to magazines as “clips” will understand the importance of being precise . . .
The first thing we should get out of the way is that marking rounds are not paintball pellets. Granted, like paintball they have a small amount of marking compound in them that leaves a colored trace where the “bullet” hits, but this is where the similarity ends. Paintball guns use compressed air. Marking rounds use an all-primer or a primer plus powder system depending on the manufacturer. If a neighbor sees two people running across the yard shooting paintball guns at each other, they aren’t likely to mistake this for a deadly encounter. If they see you charging across the yard shooting marking rounds from guns, you are likely to get a visit from your local 5-0.
To demonstrate what I’m talking about, below are two pictures of my SIG Sauer P229. In one picture, I have converted it to shoot marking rounds. In the other, it’s still loaded up with regular 9mm rounds. Can you guess which one is which? And yes, I did actually do the conversion, I’m not showing the same picture twice.
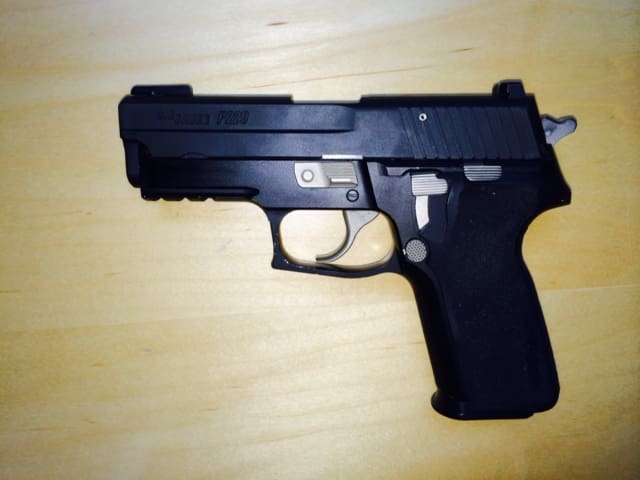
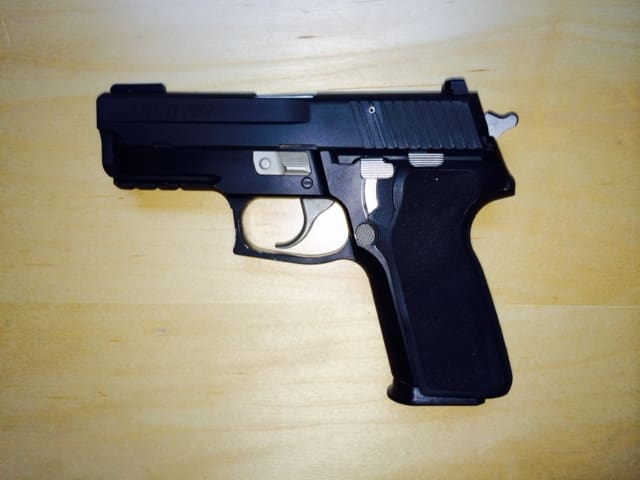
How about now?
Granted, you could use a dedicated marking round gun such as GLOCK’s G17 T FX, but those special versions actually cost more than the regular GLOCKs. Most people (and training departments) would rather spend a couple hundred dollars on a conversion kit for the duty firearms they already own than spring for a $600+ gun that can only be used for force-on-force training.
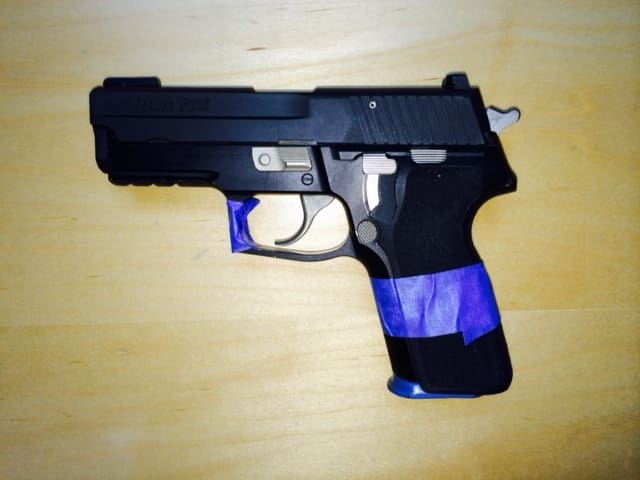
The simple fact is that there are going to be a lot more converted guns out there than dedicated ones. A converted gun should bear blue tape markings to show that it’s a marking round gun, but let’s face it, even marked the way it should be, do you think someone who sees a gun fight from a distance is going to make the distinction? Worse, if police are called to the scene, they’re likely to respond as if you’re holding a deadly weapon and that won’t be good for anyone.
Since marking round guns use primers (and sometimes powder) they have a muzzle flash when fired and definitely sound like guns. On the plus side, the reduced propellant means that they’re ear-safe. So while you don’t need hearing protection with marking round guns, they aren’t exactly quiet. Instructions from the various marking round manufacturers require a minimum stand-off distance of one foot when using 9mm/.38 Special rounds and three feet for the 5.56 mm rounds. That standoff should be respected. In one training scenario that I experienced, a person’s arm was a bit too close to the barrel when the gun was fired and the muzzle flash wound up burning a small hole right through the sleeve of his shirt.
Another big difference between marking rounds and paintball is, of course, muzzle velocity. Most paintball ranges limit paintball velocity to 260 – 280 fps and most guns top out around 300 fps. A 9mm marking round averages around 450 fps with the 5.56 rounds clocking in north of 600 fps. Add to that the fact that a paintball is generally around 17.3mm in diameter compared to the much smaller 7.62 mm of the marking round and you have 1.5 – 2 times the velocity impacting an area on your body 1/3 the size. You can see why marking cartridges are not a toy. If you get hit in an unprotected area with one of these babies, it will raise a nice welt that will be with you for a week or two.
But the pain penalty is part of the point of the exercise. Whether intentionally designed in or simply a beneficial side effect, the fact that it hurts when you get shot with a marking round increases the realism. When training in a force-on-force scenario, your conscious mind might know that you aren’t really in any danger, but the pain of being struck helps to create the fear response that scenario designers are looking for.
Speaking from personal experience, I approach every FoF training scenario with a healthy degree of trepidation. I don’t want to get shot. It’s just as simple as that. Sure, some training facilities load the students up with padding and armor, but the more hardcore ones want it to hurt a little when you make a mistake. It’s the only way to get the proper fear response.
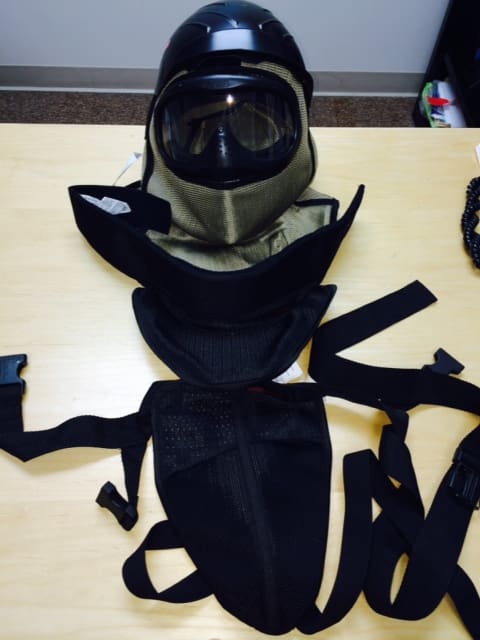
Speaking of clothing and protection, participants are required to wear some protective garb while training. At a bare minimum, a helmet with full face mask, throat protector, and groin protector are required. Long pants and long sleeve clothing along with gloves are also highly recommended as getting struck with a marking cartridge on bare skin is going to exact a bit more of a pain penalty than is really necessary for most people. Women are generally encouraged to also wear chest protection for reasons that should be fairly obvious.
Objectives
A good FoF training experience hinges on the scenario design. A well-designed scenario has specific learning objectives that have been pre-determined. There may be more than one way to solve the scenario, but in the end, either the student has achieved the learning objective or they haven’t. FoF training serves two main goals:
Stress Inoculation – The more a student is exposed to stress, the more manageable the stress becomes. FoF training is intended to expose the student to progressively higher levels of stress and as a result, the student learns to minimize its effects on his performance. This result is fairly easy to see in those who attend a day or more of FoF training. Students are more confident, act more decisively and are better able to analyze then counter advanced situations at the end than they were at the start of the day.
The first time you do a FoF exercise, everything including your technique, your observation skills and your tactical thinking will likely go to hell. As you progress in FoF training, you will gradually become used to the stress of a dangerous encounter and will be able to call upon your higher brain functions more and more. One reason why top tier military and police operators do so well under fire is that they have practiced so much using various simulation exercises that the real thing is nothing more than one more exercise.
Tactical Validation – Law enforcement and military organizations often use FoF training to simulate a prospective operation or to validate a particular tactic. It’s common for operators to construct a simulated environment based upon the mission they are to undertake and to run through it over and over until they have everything down. It also allows them to play out various alternatives in order to choose the best one for the mission. Tactical validation is also advantageous to the private citizen. A student can play out various room clearing scenarios for example and learn which work and which don’t. Depending on the design of the scenario, students may also learn how to read a situation to determine whether or not deadly force should be employed at all or if they can simply deescalate things.

Personnel
FoF training can be personnel intensive. The following are the roles that are recommended by GD in their Simunitions program but would likely apply to any force-on-force exercise:
Training Officer In Charge (OIC) – This is the primary instructor. He or she is the person who either designed the scenario itself, or has extensively reviewed it and understands the training objective. The OIC is responsible for choosing the role players and ensuring that they understand the roles they are to play. The OIC sets the training objective, designs the scenario to fit the facilities/available manpower, etc., and reviews the performance of the student at the end. The OIC’s job is to watch and evaluate the student’s performance against the target objective. The OIC is responsible for initiating the scenario as wall as determining when it ends. The OIC should never ignore safety violations, but safety is primarily the responsibility of the next person on our list.
Training Safety Officer (TSO) – The TSO has complete responsibility over the site and personnel where safety is concerned. The TSO is responsible for ensuring the physical security of the facility and in making sure that no dangerous items are brought into the secure training area. In many cases, the TSO will have additional Safety Officers to assist but there is only one TSO and he or she is responsible for calling the range hot or cold. The TSO’s job includes performing final checks on the safety equipment of the participants in the shoot house. The OIC cannot initiate the scenario until the TSO has declared the range hot.
At a bare minimum, a FoF training exercise must have an OIC and a TSO. A single person cannot do both duties. The OIC, TSO, and assistant SOs will generally be identified in a scenario by orange or yellow vests. It is generally considered poor form to intentionally drill one of them with a marking round, but accidents do happen which is why all participants in the shoot house must wear safety gear.
Role Players: These people are what make the scenario really come alive. Role Players are the bad guys, the good guys, and the innocent bystanders in the simulation. The student never knows who is who until it’s too late. Role players generally fall into two categories – scripted characters and window dressing (my terminology). The scripted characters are usually members of the training cadre, know the learning objective of the scenario and have worked with the OIC to craft the role that they will play to create a believable scenario. Some of these people will be actively working against the players, others may actively help, while still others simply provide additional bodies. “Window Dressing” role players are usually conscripted to provide extra realism to the scenario. They may or may not know the overall design objective and as often as not are simply players who just recently ran through the scenario themselves. They are used when extra bodies are needed. For example, if your scenario involves a bus or a theater, having extra window dressing to spread around increases the level of realism. Plus, because everyone is wearing a mask, the player never really knows who is an active role player and who is windows dressing. The most important skill for a role player is the ability to follow directions. The OIC has designed the scenario and chosen the specific roles for each player. The only wild card that should ever be in a scenario is the student. Role players should execute their role each and every time exactly as they were told to do. Deviation from that script changes the scenario and can compromise the training objective.
Student – This is the person (or persons if a squad based scenario) whose skills and judgment is being tested. As a student, you need to leave the ego behind. Unless you have been under fire before, chances are that you are going to make a lot of mistakes.

One major question that often comes up is whether or not to video record the scenario. Video recording of a scenario is a great thing provided that you have the proper attitude. When in the scenario itself, tunnel vision takes over and your will not see or remember much of what went on. The ability to view your performance after the fact has some tremendous value. I can still remember watching my first training session on video. I was shocked watching my gun hand. Never mind the weeks of training and the thousands of rounds I had shot learning to squeeze the trigger ever so gently. During that first exercise under fire, I watched myself jerk the trigger so hard with each shot the gun moved more from that than from the recoil. The problem is that if you really screw up a scenario, you get to re-live it and all your classmates get to see it as well. Again it serves to remember the objective is to make your mistakes now when it doesn’t get anyone dead so that you don’t make them when it could cost lives. In any event, unless the recording is needed by a police department to be used as evidence of proper training down the road, video recordings should be destroyed at the end of the day (and not wind up on YouTube).
A good FoF experience only happens if proper care has been taken in the design of the scenario. The Scenario Designer starts by defining the objective or teaching point of the scenario. Some examples might include:
- How the participant reacts to a car jacking
- Police dynamic entry into a hostage situation
- A no shoot situation where the participant needs to find the non-lethal resolution
- Dealing with armed invaders in the middle of the night
Once the overall objective is determined, the designer next focuses on the details. How will the situation be set up? What props are needed? How does the available training space need to be converted to make things as realistic as possible? How many role players are needed and what will be their exact roles? It is this attention to detail and determination of training objectives up front that really distinguishes true FoF training from paintball.
I’ve seen some truly bizarre things happen during training sessions. In one case the scenario involved the student starting the scenario standing at a check in desk for a hotel. Behind him in the lobby, two men enter and begin shooting the place and the role players up. The objective of the scenario is for the student to safely extricate himself from the situation. How he does that is up to him. Generally it will require eliminating the gun toting bad guys, but he must also decide how to handle the other role players. Remember that he does not know who is dangerous and who is simply an innocent bystander. During the run through of this scenario, one student ordered a role player to face the wall and spread his hands and feet. The role player (who was simply a bystander) complied. The student then proceeded to execute him with two shots to the back. When the scenario was played back, the student was asked why he did that. His response was that he thought he saw the guy go for a gun. Which didn’t happen.
Another scenario involved a movie theater (about four months after Aurora). The student is sitting in the theater watching the show when a role player stands up and starts going off on Obama. Eventually the role player focuses his attention on the student and starts accusing him of being an Obama lover, etc. After about 45 seconds or so of abuse, the “manager” comes into the theater with a flashlight and orders the nut job out. This scenario was designed as a “no shoot” scenario. The correct response in this scenario was to simply try and calm down the crazy guy (who was unarmed and never approached closer than 5 feet). Unfortunately, one student didn’t read things that way. As soon as the manager entered the theater with the flashlight, our hero was out of his seat, drilled the manager then put two rounds into the crazy guy.
If you want to get a feel for how these things work (mistakes and all), its worth taking a look at the First Person Defender series put on by Gun Talk TV. In these videos, the instructors explain the objective of the scenario, run the student through it, then critique it afterwards. They then give the student another chance to do it again, sometimes changing a few of the parameters. More often than not, the student learns quite a bit and second run through is much better than the first. What they don’t show (because they don’t do it) is how the lessons from prior scenarios makes the student perform better in new scenarios. You get a lot of muscle memory from running through each scenario and you learn what to do and what not to do. You may make a different mistake in a new scenario, but you rarely make the same mistake as before.
Shoot Houses
A force-on-force shoot house can be very simple or get very elaborate.
Something as simple as four plywood walls and some movable partitions are all you need to get started. An example of this comes from Tactical Dynamics Firearms Training in Massachusetts.

A more complex multi-room facility might look something like this from the O’Gara Tactical Operations Center in VA:

It has a number of rooms in a fixed layout with different entries and exists. It is fairly simple construction and can be reconfigured easily. Depending on the needs and available funds, a facility like this could be used to create a full scale mock-up of a building that a team might need to clear. The team could do a number of run throughs before getting to the real deal.
The LAPD has a “Situation Simulator” Village at their Ed Davis facility

The Orange County Sheriff’s Tactical Training Center has some realistic storefronts:

On a grand scale, force-on-force training can also be used to “whiteboard” things out. Right at the end of 2012, TTAG partnered with King 33 Training to try and determine exactly how the Sandy Hook school shooting might have played out differently had there been “good guys with guns” on the premises. You can read the entire overview and analysis here, but to summarize, the experiment yielded four conclusions:
- A uniformed and easily identified armed security/police guard proved ineffective at interdicting the shooter because the shooter had the advantage and could take out the armed guard before beginning the rampage.
- Depending on the level of training, an armed teacher had varying levels of success neutralizing an armed attacker who entered the classroom with no prior warning
- An armed teacher with some degree of prior warning (heard gunshots in the hall prior to the bad guy entering their classroom) had a very high chance of successfully neutralizing the threat.
- An unidentified (by the killer) armed person who was on the premises and responded immediately upon hearing shots fired had varying levels of success depending on their training. Military or police trained individuals did well, non-training people less so.
TTAG is not likely the first to use force-on-force training this way and probably won’t be the last. The SIG Sauer Academy will be offering a course next Spring as a sequel to their Bullets & Bandages course. Called Bullets & Bandages II, participants who have completed Bullets & Bandages I will be able to test their skills under fire. If you catch a Sim round in the arm, you need to do something about it right there and then. Need to practice evacuating a down colleague while under fire? You’ll get to do that too. While someone is shooting at you for real.
Hopefully by now, I’ve managed to pique your interest in force-on-force training. It is a good experience for everyone to have and complements rather than replaces any other type of training that you may be doing. FoF training is different from just about everything else simply because someone is shooting at you and that changes the calculus quite a bit. While most of the better schools now offer FoF training, you don’t have to spend big bucks or fly across the country to do it. For folks in the U.S., General Dynamics partners with local ranges all over the country to offer Simunitions training to non LEO/Mil folks. Called the United States Range Program, you can select your state and get a list of local ranges that offer Simunitions training. One such local example is Critical Defense Institute in Manchester, NH which I reviewed last Spring. In any event, if you live within reasonable distance of a FoF facility and can afford the training cost, there is no reason not to. It is probably some of the best training you can get to make you more proficient with your firearm.


This actually sounds pretty interesting. It also sounds pretty expensive…
Therein lies the dilemma.
Not as expensive as you might think. It all depends on the range. Figure $150 – $250 for a full day of training. Not cheap. I get that, but it’s not outrageously expensive either. One day of FoF training is worth hundreds if not thousands of live ammo down range.
What makes it kind of pricey is that the cost of the marking rounds ($35 for a 50 round box give or take) plus the fact that each person must go through the scenario by themselves. This limits the number of students in a class to 8-10 people which makes it more expensive on a per person basis.
Magazine/clip: What do you call that thing that goes “ping!”?
You mean in the M1 Garand? That’s a clip.
En bloc clip.
A fun little way I help my wife remember it, is that clips LOAD magazines.
The way I always kept it straight was that clips have exposed ammo, magazines do not.
I wish I could remember which article it was, it was about reminiscing about a classic WWII carbine, that went, “pow! pow! pow! pow! pow! pow! ping,” just a day or two or three ago. The gentleman in the film showed the clip with the 6 (or was it 7?) rounds in it, then, rather than using it to load a magazine, he just dropped the whole assembly into the rifle, which had no detachable magazine. Maybe it’s just a clip that fits, along with the rounds, into the weapon’s bullet place. The author said something about reminiscing about the sound of the ‘ping” when the clip got ejected. I’d guess it was something like a “loadable clip,” but I don’t want to be bandying the wrong term about. I guess it’s not that big of a deal, I’m just a stickler for correct terminology.
That’s the “en bloc” clip Because it goes in the magazine (bloc?). M1 was the firearm in the video and the only one that uses an en bloc clip that I know of. whereas most clips are “stripper clips” because they are stripped of the ammo as it’s loaded into the magazine. I think Most bolt guns, like the Mauser M98, are of this variety.
“it goes in the magazine (bloc?)”
Thanks for this.
Just FYI, I’m pretty sure that in French, “en bloc” means “in a block” or “in the block,” which makes perfect sense, like a “brick” of firecrackers. 🙂
Great follow up article Mr. Barrett.
I’ve been fortunate to be a part of this training many times. It is fantastic. If anybody has a chance to participate in this, do it.
The welts go away after a day or so….
Tom, my ego might take more time to heal.
One thing, being ‘under fire’ in the military is quite a bit different than in civilian situations. In the military we charged the the shooters, cover to cover, firing as we went. In civilian situations taking cover is paramount, time to sort out and think, time is of the essence to be sure. Bottom line, no way out, get between the threat and those you are protecting. The rest, hopefully, with training, will come to you. Do not ever try to clear an area by yourself, especially if you are the average citizen. Let the paid men and women do it. I once lived in an area where I felt the need to clear the house (rental) every time I left and came back at night, after three break ins while I was at work. People, it ain’t no fun. If you have a training facility near you and can afford it, make use of it. That firearm is only as good as you are. It will not shoot anyone by mistake, you will.
No kidding about clearing by yourself. About the most uncomfortable feeling you can get without actually having someone shoot at you. About a month after I finished field training, I cleared an apartment by myself because I thought a stabbing victim was bleeding to death inside. Turned out he wasn’t as badly hurt as I thought, and I got the biggest anatomy chewing since Basic at Ft. Benning.
Not trying to brag, either, it was a very stupid thing to do. Even if I at some point in the future have cause to do it again, it will still be stupid.
Do not ever try to clear an area by yourself, especially if you are the average citizen.
My house clearing training experience had me shot in the back. That was the teaching point, to reinforce that an individual much less an inexperienced one should not attempt this.
Great article.
I remember the first time we trained with “marker rounds”. I was in the Army and this meant the end to glorified laser tag. It was good training and proved invaluable when learning how to engage real human targets, in a real environment while not getting yourself dead.
I’d recommend anyone who carries undertake this training if they have the means. If nothing else it shows how inadequate simple range training is for the real world. It also develops the proper mind set should a real situation happen. Simply put range time is better than nothing but if you are preparing for the need to defend yourself FoF training is worlds better.
Instead of “marking round” (which seems vague), you could perhaps call it a simulated munition. Maybe that’s a stretch.
Nice post.
There’s a world of difference between shooting at stationary targets on a range and force on force training where the opfor is moving aggressively and shooting back. FOF training is worth it for that alone.
If the scenarios are realistic, it’s also invaluable in improving reaction time in the event you actually need to defend yourself.
Simunition is a lot of fun, and very informative. You can use your own gun with the same magazine capacity, same grip, same holster, same garments, etc. the 9mm marker rounds are decently accurate, but the recoil is obviously much less. Still, moving and shooting is great training, especially if you have a bad guy shooting back or advancing towards you.
Comments are closed.