")
Tiger McKee of tacticalwire.com writes:
For the first AR I built, back in the mid 80’s, I used a mil-type barrel wrench, torque wrench, and some old punches and hammer. This can be done, but to get it “right” – assembling a reliable, accurate, and long lasting rifle – requires knowledge and specific tools. There are books on building AR’s, or videos for the visually oriented; Brownells carries good ones. Having the proper tool for any project makes the job easy and the end results look right. Again, Brownells has what’s mandatory, some tools that will make the job easier, and a few that are good to have if you’re planning lots of AR work [complete armorers’ kit above] . . .
A barrel nut wrench is mandatory. We’ve seen quite a few AR’s come to class without the barrel nut properly torqued, which can be dangerous. I use a wrench, more like a ring, that completely surrounds the barrel (714-000-020) with six pins to engage the nut. The ring requires removing the front sight base. In my opinion it’s worth the effort, especially if you have to apply a lot more torque than the min.
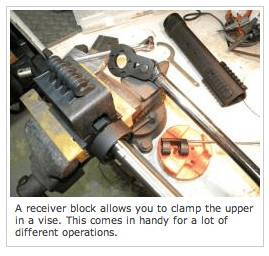
The older military type units will work but with only three extensions it’s not uncommon for them to slip off the nut. (Note: Some handguard/nut designs require special wrenches for that particular combination.) To do all this work on the upper receiver you’ll need either a set of barrel jaws, to clamp the barrel in a vise, or, an “action block,” (080-000-661) a better option that clamps around the receiver.
The barrel has to be torqued to a min of about thirty-four lbs. But the nut must be positioned so the gas tube freely fits through it into the receiver to mate with the gas key on the bolt carrier. Obtaining this alignment usually requires more than the min torque.
To check alignment I use an index gauge (080-216-014) that fits into the gas key of the bolt carrier. Once installed the gas tube should actually make a rattling noise when you shake the upper assembly. This wiggle room allows the bolt carrier to slide into position smoothly without wearing the gas key or applying force to the tube. Zediker, in his “Builders Guide,” (995-000-005) states that proper alignment of the gas tube is a key to accuracy.
Once the barrel is installed you have to check headspacing, confirming chamber length with the bolt closed, in battery with the barrel. Brownells carries gauges, or if you’re not planning on doing a lot of AR work find a buddy or shop that will check spacing, which only takes a few minutes. Improper headspacing can lead to explosions, and not the funny kind.
To build an AR requires punches. You need starter punches (080-685-000), roll pin punches (230-112-105), and standard punches, like a 1/8 punch to install hammer/trigger pins. Without the right punches you can ruin pins and/or destroy a receiver.
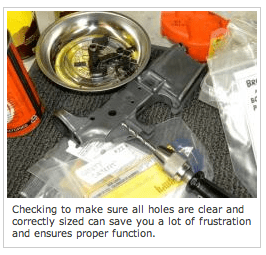
Prior to assembling the lower receiver I prep it by checking all the holes for detents, springs, take-down pins, and hammer/trigger holes with the correct size drill bits in a pin vise, which is like a screwdriver handle for small drill bits. Even a quality receiver can end up with small obstructions in these areas that will prevent proper function. (#22 bit for safety detent hole, #23 for bolt stop plunger and hammer/trigger pins, and #40 for pivot/takedown pin detent holes.) During assembly every part should be inspected for fit and function prior to final installation.
There are a lot of other cool tools that make your work easier. I use a small nail, bent into an “L” shape to hold the bolt release, spring and detent in position while driving the pin that holds it all together. Removing this pin requires a special tool (080-216-012) that is cut on one side so you can drive the pin out without beating up the receiver.
A mag release tool (100-002-127) makes installation or removal of that part simple. A pivot pin installation tool (080-216-011) holds the detent and spring in place for installing the pin. Removing this pin is about impossible without a special tool (080-216-010).
True success with any project relies on knowing what you’re doing, and having the proper tools. The AR is no exception.
Tiger McKee is director of Shootrite Firearms Academy, located in northern Alabama. He is the author of “The Book of Two Guns,” writes for several firearms/tactical publications, and is featured on GunTalk’s DVD, Fighting With The 1911 Website: www.shootrite.org


using a handguard like the Geissele SMR that doesn’t require indexing makes the job of torqueing the barrel much easier. Heck, using everything made by Geissele makes the AR build easier!
+1e12 for Giessele
Cost for a good basic setup?
The Brownell’s link takes you to a page that lists their standard AR armorer’s kit (tools only) for $999. An upgrade to the kit runs $349.
Unless you’re going to build and maintain several AR’s over a period of years, that’s definitely a no-go. Well, for me it would be. I don’t have that kind of money to spend on specialized tools. For that price, you could get a decent entry-level AR-15 right off the shelf, plus a cleaning kit and maybe even a
cheapcost-effective optic to go with it.I’m sure you can do without many of the tools found in that kit. I know I have.
This is part three of a four part series. You can find parts one and two here and here.
Isn’t the headspace set when the barrel and barrel extension are produced? It doesn’t seem like there would be any way to fix poor headspace without getting a new barrel.
Bolt replacement…
The bare basics are AR tool from tapco, punch set, rubber mallet and needle nose pliars. Plus a buddy to help hold it all together.
I found that a feeler gage is a good thing to have to keep the detent pin from flying when putting the front takedown pin in.
Anybody asks me why I love my Communist Iron, I’ll point ’em at this article…
😉
If you’re not doing any Upper work, how would the recommended tool-set differ?
See what cazyteddy wrote a few posts above. I would add a mag vise block. This is why so many people build from stripped lowers but buy the complete upper and BCG. Uppers are quite a bit more ambitious, IMO.
Of course, a small, well-lit closet with the walls and floor painted white will help you find the springs when they go BOING!!
For the last lower parts kit I installed I used a set of punches, hammer, hex key, tweezers, and a bottle opener keychain shaped like a bear. You’ll need a castle nut wrench too.
I’ve built three with pliers and nails. When I needed to hit I had a block of wood. When I needed to turn I had an old leather belt. They’ve been running fine for years.
The only tool I needed for my AR build was cash. I let Smith & Wesson do all the hard work.
TTAG should have an article titled “tools you’ll need for AR build tools kit” and maybe another titled “how not to spend $1000 on AR build tools.” Most the items shown are cheap everyday tools found at the hardware store.
You’re indeed correct. Brownells has you paying for the service of putting it all together for you. Those that know what they need already have most of the tools anyway.
It’s the same way I make money in a different type of parts industry. We’re not preying on the uninformed, we’re just making you pay for the concierge service. You know, capitalism and shit. 😀
Roll pin punches aren’t a very common item. They’re not like standard pin punches. Roll pin punches have a pilot nipple on them to prevent them from jumping off the pin.
As for a hammer: Any 4oz ball pein hammer will do. Ace, Sears, et al will carry them.
The 1/2 torque wrench – most guys who are handy around cars and trucks will have one – or more – torque wrenches.
Pin punches – most handy people will have some, but perhaps not as fine.
What you won’t have will be the barrel/action blocks that enable you to hold the lower or upper competently in a vise. Those, you could machine yourself out of UHMW if you wanted – or you could make them out of suitably good hardwood (like maple or such).
The wrenches for the castellated nuts on the barrel and buffer tube – those, you should probably buy, especially the barrel wrench. Trying to cobble something together is a good way to make a mess of things.
Screwdrivers – anyone who is around guns should get a set of GUNSMITH screwdrivers. Don’t go taking your guns apart with common Sears & Rubbish screwdrivers. Wheeler has a set that would keep most people in business for about $90, last I looked.
34 ft-lbs or 34 in-lbs? The preceding are torques, 34 lbs is a force. Yes I will complain similarly if you tell me your motorcycle tire has to be aired up to “34 lbs”. Except that will be a rant on the difference between pressure and force.
At least with tires, PSI is the standard.
Not giving the “inches” or “foot” in a torque rating means you’ll be either 12x or 1/12 of the torque you actually need. What if you like the metric system? How many Newton-meters is that?
It’s 34 ft-lbs minimum. Torque to that level and then continue to tighten until the gas tube hole lines up.
That picture makes AR builds look daunting, had I never done it before I’d get the idea that it is complex. Fortunately building an AR is a ridiculously easy task even for a beginner.
What I use(d): an upper jig to hold it in place, AR armorer tool for castle and barrel nuts, punch set, mallet, vice grips… and a flat head screw driver. With the exception of the jig and the armorer tool I already owned everything else. Probably would have been a good idea to get head-space gauges, but I honestly never came across any info for AR building that mentioned them. In any case I have worked on more than enough ARs between myself and my buddies that it seems to be a non-issue.
Don’t get me wrong, if I was in the business of building ARs or working on them day in and day out I’d spend the scratch for a nice setup like that. But for someone looking to build one or two ARs? Not worth it. A little elbow grease and mostly common tools and you should be fine.
Yeah, it’s really not that hard. I’ve “built” about a dozen in the past 2-3 years and you can spend about $60 (vise block and AR wrench like the one from DPMS) and then hit Harbor Freight for the rest. I usually cover the upper and lower in blue painter’s tape to not ding or scrape the upper/lower receiver and can get one assembled in about an hour. The better quality the parts the better the build, but prior to last December I could put together an AR for less than $500…
Ditto, I have about a hundred dollars in tools. I already had a torque wrench so the receiver blocks were the big cost at around 60 bucks. I have had great success with the GI wrenches, not a single problem. Roll pin punch set wasn’t much at all. It is not a complicated or hard process. I love building my own.
Whew. Thanks for the perspective. That post was giving me angina. Pulling together everything for my first AR build and thought I had it under control… after your comments I realize I do. I want to build a lightweight rifle between a Giessele trigger on one end and a Noveske barrel on the other without breaking the bank.
Also, if you focus your money and attention to using all high quality parts, assembling them together will be quite easy, even with few specialized tools. Skimp with cheap “milspec” parts and you will be frustrated.
34in-lbs is less than 3ft-lbs. If you cant figure out if he meant in-lbs or lbs-ft, you shouldnt be working on it.
The picture is missing one of the most vital tools for good AR assembly: blue painter’s tape. Without painter’s tape you WILL mark up your anodizing on at least one roll-pin installation.
Also, I know it seems like yet another $25 to spend (even for the cheapest set off Amazon) but I highly recommend getting a set of roll-pin starter punches. These are hollow-end tools which squeeze down the roll pin a bit and hold it from the outside, making it about 100X easier to install.
I fscking hate dealing with roll pins. I’m now a big fan of AR lowers which use threaded dowel pins instead of roll pins in critical places like the bolt catch pivot point.
Yep… right up until the point when you realize that there’s a very good reason to not use steel screws in aluminum.
Linux or Mac user?
You can (and should) check the headspace before installing the barrel onto the upper. There’s nothing about the installation of the barrel into the upper that changes the headspace. The barrel extension, the length of the barrel tenon and the depth of the chamber control headspace.
All I do is put in a “go” gage onto a barrel (with extension) that is held in a vise. I then take the assembled bolt and push it into the extension. If it rotates to full lockup, we’re good. OK, now pull the bolt out. Puff some air into the muzzle while you hold your hand over the breech, capturing the “go” gage.
Put in a “no go” gage. Repeat. The bolt should NOT be able to cam to full rotation.
Puff out “no go” gage. Now you can proceed with the installation of the barrel+extension into the upper.
If your bolt will not close on the “go” gage, this means that your chamber is less than minimum depth. There’s too much of the case head sticking out of the rear of the chamber in the barrel, and this is preventing the bolt from fully closing. This is what can result in a problem, as the bolt blows open before the gas pressures have fallen to safe levels. OK, you’ll need to do one of two things:
1. Deepen the chamber. You’ll have to carefully hand-ream the last few thousandths of the chamber. You’ll need a chamber reamer and a T-handle.
2. There’s a chance your extension is out of spec – in which case, you would need to pull the indexing pin in order to unscrew the extension from the tenon. Good luck with that. I suppose you could TIG a bit of welding rod onto the pin and pull it that way. They’re usually just an interference fit.
I feel like a cheat for just building lowers – and hiring a gunsmith to do almost all of the fitting. I did drill a few holes and buy the parts. Those lowers work like gangbusters.
Like a whole lot of hobbies, I’d like to build also. Unfortunately, I don’t have the time and resources. A good reloading kit will be the next DIY project – after housework and such, of course.
Still, cool info. I respect good ‘smithing.
I call Bullsh*t on this article. Didn’t Tiger McKee have Red Jacket build him some AR-15s? So if he knows so much about building them why didn’t he do it himself? Did he just do it for the show or is he just full of hot air. I believe the latter.
Well, since he’s got his reputation and associations with other folks like Clint Smith at Thunder Ranch, and you have, well… a nickname on a web blog… I’m gonna have to go with him on this.
Actually, Red Jacket lost the contract to Tiger, due to seriously crappy build quality and weapons that were inop out-of-the-box. The Shootrite Katana is currently being supplied by a new company out of Alabama, called MHT Defense.
When it comes to “gun writers” I think about 90% of them are full of sh*t. They are the same people that hang out at gun stores and tell everybody that they need to buy 1911s and M1As. Most of their articles are regurgitated Jeff Cooper nuggets and most of their techniques are plagerized/basterdized versions of Police/Military tactics. The few that are worth a sh*t stay away from reality tv and dont need to act like total asshats to get their point across.
I’ve had more parts fail with AR15s than M16/M4’s. I just ordered 2 firing pin retainer pins and an ejector as a result. I’m not a milspec fanboy, but the abused ones I’ve been issued ran better than the ones I have bought. Lesson learned – I also just ordered 2 lower parts kits and an upper parts kit – for the next thing that breaks.
Comments are closed.